Hershey’s Chocolate Frosting Recipe On The Stovetop

This is my quick stovetop Hershey’s chocolate frosting with butter, milk, Hershey’s cocoa, powdered sugar, vanilla, plus a pinch of salt. The vintage recipe is ready in about 15 minutes. It turns silky and sets to a glossy finish quickly, so you get clean, pretty slices every time. The three-cup recipe is perfect for 9″ rounds, a 9×13-inch cake, or cupcakes.

| Prep Time | Cook Time | Servings | Prep Level |
|---|---|---|---|
| 5 minutes | 10 minutes | 3 cups | Beginner + |
I like to use this recipe for cakes, including the classic, moist Hershey’s chocolate cake that has been around for generations. The frosting also works on cupcakes or a Bundt cake.

Julie’s Ingredient Notes
The ingredients are simple, and most people have them in their pantry.
- Butter – you can use salted or unsalted for this recipe. But if you add a pinch of salt to the ingredients, use unsalted butter.
- Unsweetened cocoa powder – you can use any brand of unsweetened cocoa powder for this recipe.
- Pinch of salt – this is optional, but it gives the frosting a little bit more of a chocolatey flavor and balances out the sweetness. It doesn’t taste salty, just deeper.
- Milk – Do not use heavy cream, or the frosting will not cook properly. For this recipe, I use 2% milk.
Full printable recipe with measurements and instructions listed at the bottom of the post in the recipe card.

Tips For Making Hershey’s Chocolate Frosting
Follow the tips and your frosting will turn out perfectly every time.
- When it becomes a little thick, remove it from the heat and add the vanilla extract, then the powdered sugar, beating it all together.
- The frosting will begin to look glossy as it thickens.
- If you’d like to add a pinch of salt, add it at the end and mix well.
- Working Quickly (It Sets Fast!) – Spread the frosting within 5 minutes of mixing while it’s shiny and soft. If it firms up, whisk in 1–2 teaspoons warm milk a little at a time, or give it 5–10 seconds in the microwave and stir until smooth.
Step-By-Step Instructions
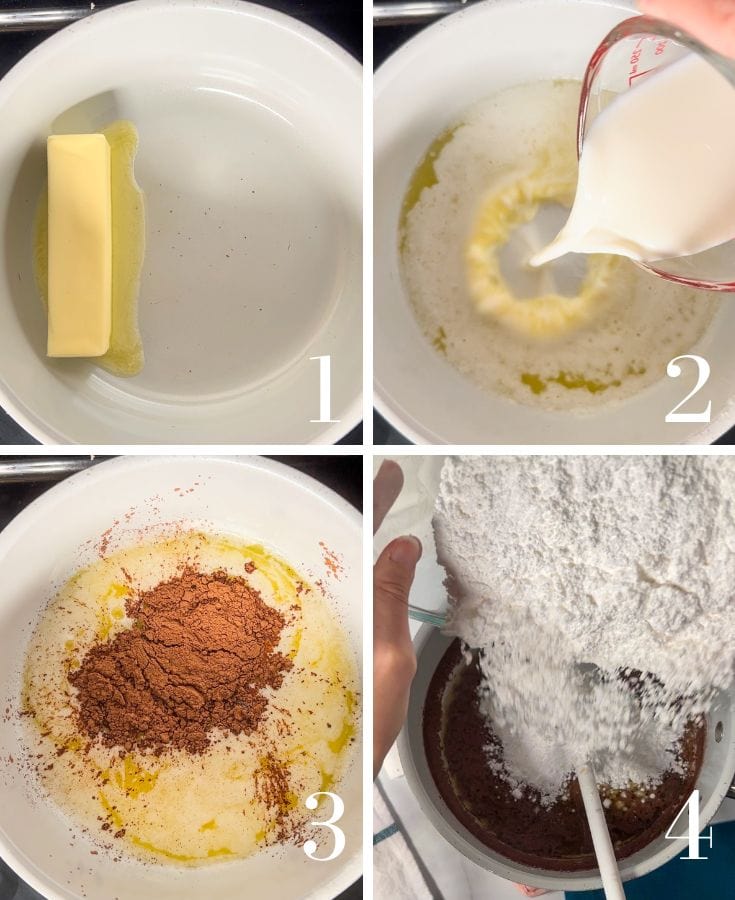
- Add the butter to a saucepan and melt it.
- Pour the milk into the saucepan and mix.
- Next, add the Hershey’s unsweetened cocoa to the pan and mix well.
- Remove from the stovetop and add the vanilla extract and powdered sugar, and mix well.
- If it is a little lumpy, you can beat it for about 30 seconds with a hand mixer.

Storage And Make-Ahead
Place any leftover frosting in an airtight container and press plastic wrap right on the surface so it doesn’t crust. If your kitchen’s cool, it can sit on the counter 1–2 days; otherwise, pop it in the fridge for up to 1 week.
Making ahead? Freeze up to 2 months, then thaw overnight in the fridge. When you’re ready to use it, bring it to room temperature and give it a quick whip with beaters, adding 1–2 teaspoons of warm milk a little at a time until it’s silky and spreadable again. If it’s still a tad firm, 5–10 seconds in the microwave and a good stir does the trick.
FAQs
Can I use Dutch-process cocoa?
Yep! Any unsweetened cocoa works here. Dutch-process will taste a little deeper and smoother; natural cocoa gives a brighter, more “classic Hershey’s” vibe.
Can I use cream or half-and-half?
Stick with milk for this one. Cream and half-and-half can make it too heavy and set oddly. If you want it richer, use whole milk and an extra teaspoon of butter instead.
How do I fix grainy frosting?
Whisk in 1–2 teaspoons of warm milk and keep stirring until the sugar melts smoothly. If it still looks sandy, give it 5–10 seconds in the microwave, stir well, and repeat just once more if needed.
Butter vs. margarine?
Butter, every time. It gives the best flavor and that pretty glossy finish. Margarine can turn waxy and dull, so save it for toast and use real butter here.
Can I pipe this instead of spreading it?
Yes, but for piping, I would add 1 to 2 more tablespoons of powdered sugar to give it a slightly thicker consistency.

Hershey’s Chocolate Frosting Recipe
Ingredients
- ½ cup of butter
- ½ cup of 2% milk
- 2 Tablespoons of Hershey’s unsweetened cocoa
- 1 teaspoon of vanilla extract
- 2 ½ cups of powdered sugar
- Pinch salt optional
Instructions
- Add the butter to a saucepan. Melt the butter on medium heat.
- Next, add the milk and cocoa and mix well.
- Cook for a few minutes until the mixture is a little thick.
- Remove from heat and add the vanilla extract.
- Add the powdered sugar and whisk to combine.
- Immediately spread over the cake as it hardens fast.
Video
Notes
Nutrition
If you are making a layer cake, you will want to spread the frosting on the top of the bottom layer first.

Once you spread the frosting over the middle, you will place the other cake on top and spread it on the sides of the cake, though make sure your cake has completely cooled first.
If you want a simpler cake, you can spread this on top of a classic old-fashioned vanilla pound cake, which is more traditional than a tiered cake.


