Homemade Buttermilk Biscuits

If you’ve ever tried to make homemade biscuits, you know that the process can be a little daunting. But don’t worry, I’m here to show you how easy it is to make homemade buttermilk biscuits. With just a few simple ingredients, you’ll be able to make these light and fluffy biscuits in no time. So grab your apron, and let’s get started!
Prep Time: 15 minutes
Cook Time: 15 minutes
Total Time: 30 minutes
Servings: 12
Preparation Level: Beginner +
Making flaky biscuits used to scare the heck out of me. I’d follow the directions on the recipe, but somehow they would come out of the oven as hard as a hockey puck.
So, for a long time, I decided that I’d never make a good biscuit. And for years, I didn’t try. And I’d laugh, because biscuits can’t be that hard to make. But, they were for me.
I love serving these with comfort food meals that you can prep ahead of time. Just add your meal to the oven, whip up these biscuits, and you’ve got dinner.

I finally decided to try again. I got out a recipe and planned to make my grandmother proud. After all, she was the queen of making biscuits. She could whip up a sheet and have them in the oven before I even got done washing my hands for lunch.
My grandmother lived in Tennessee, and in the South, biscuits are a staple–a way of life, especially at her table. She was an expert–so much that they even talked about her biscuits at her funeral–those flaky layers, the perfect size, the wonderful flavor.
There is some serious comfort in a warm biscuit with a spoonful of whipped butter melting on top. In fact, I think buttermilk biscuits might be one of the top things in this world that bring me comfort.

Ingredients
- All-purpose flour
- Baking powder
- Salt
- Butter
- Buttermilk
Full printable recipe with measurements and instructions is listed at the bottom of the post in the recipe card.
Step-By-Step Instructions
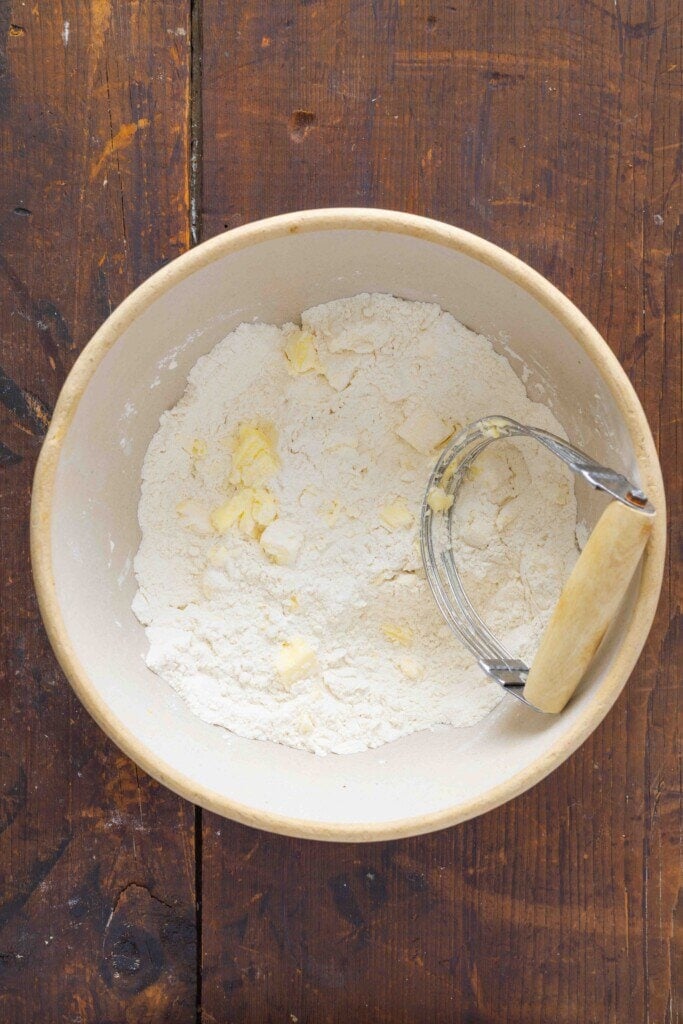
Step 1: Add the flour, baking powder, and salt to the bowl. Mix it together and add softened butter.
Start mixing the butter in with a fork or a pastry blender until it creates little pea shapes in the flour. You can see in the picture above what it will start to look like.

Step 2: Create a little valley in the middle and add the cold buttermilk. Stir until the entire mixture is combined.
Most of the time, I don’t need to add any extra buttermilk, but on occasion, if the mixture seems a little dry, add a teaspoon of buttermilk at a time.
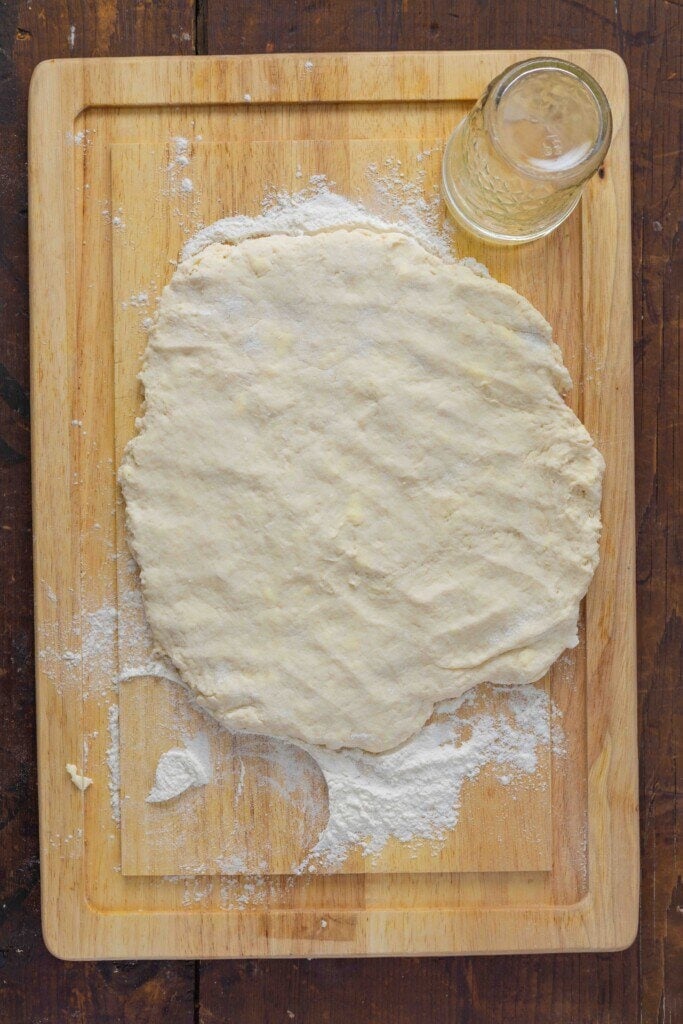
Step 3: Add a little flour to the countertop and roll out the dough with your rolling pin.
I folded the dough into thirds, rolled it down to 1″, then turned the dough, repeating the process 4x to yield the layers.
My grandmother had a little cookie cutter to cut the biscuits. It looked older than me and worked perfectly. I didn’t have that, so instead, I grabbed a small glass from the cabinet and used it. It was the perfect size for biscuits.

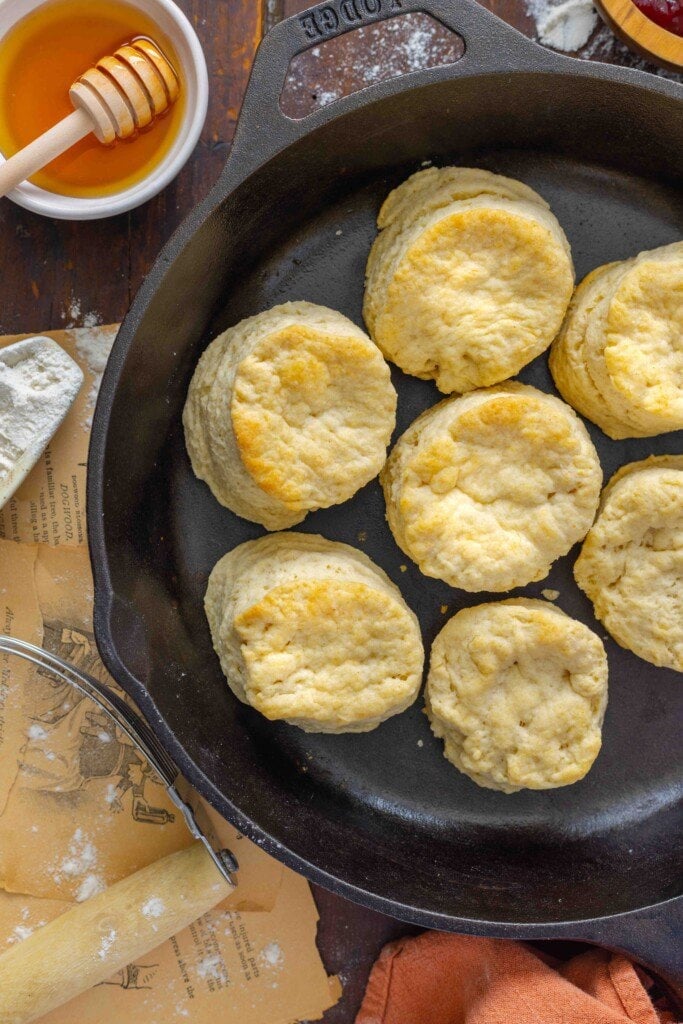
Step 4: Add the biscuit dough to a buttered cast iron skillet or baking sheet and bake for 12-15 minutes at 450 degrees. When they are golden brown on top, they are done! You can add some melted butter to the top or leave them as is.
If you’re nervous about creating a hard biscuit, never fear, this recipe will give you the confidence to bring easy buttermilk biscuits right into your kitchen. And there’s nothing yummier than a warm biscuit with some butter and jelly on top. These are perfect for biscuits and sausage gravy.

Tips For The Best Results
- Quality Ingredients: Start with high-quality ingredients. Use fresh buttermilk if possible, unsalted butter, and a good brand of all-purpose flour for the best results.
- Cold Ingredients: Make sure your butter and buttermilk are cold. Cold ingredients area always going to help create a flaky texture in the biscuits.
- Proper Butter Incorporation: Cut the cold butter into small cubes and mix it into the dry ingredients using a pastry cutter or your fingertips. The butter should be a pea-sized course mixture and evenly distributed throughout the flour mixture.
- Baking Temperature: Preheat your oven to a high temperature, around 450°F (230°C). The high heat helps give you that golden brown crust while maintaining a soft interior.
- Proper Cutting Technique: Try not to twist the cutter while pressing down on the biscuits, because it will seal the edges and keep it from rising properly.
- Close Placement on the cookie sheet or pan: Arrange the biscuits on the baking sheet with their sides touching. This helps them rise higher and supports each other during baking.
- Timely Baking: Bake the biscuits until they are golden brown on top, usually around 12 to 15 minutes. Avoid over-baking the biscuits, or you might end up with dry and hard biscuits.
- Cooling: Allow the biscuits to cool for a few minutes on a wire rack before serving. This allows them to set and ensures a better texture. This is the hard part because they smell so good!


Easy Homemade Buttermilk Biscuits
Ingredients
- 2 cups all-purpose flour
- 1 Tablespoon baking powder
- 1 teaspoon salt
- 8 Tablespoons unsalted cold butter cut into small cubes
- 3/4 cup liquid cold buttermilk
Instructions
- Preheat oven to 450-degrees.
- Mix the flour, baking powder and salt together in a medium-sized bowl.
- Add the butter and mix into the flour with a fork or pastry blender until you end up with little pea-sized bits.
- Add the cold buttermilk and stir until combined.
- Place the dough on a floured surface and flatten out to about 1-inch thick. Fold the dough into thirds, roll it down to 1", then turn the dough, and repeat the process 4x to yield the layers.
- Cut out the biscuits and place into a buttered iron skillet or onto a baking sheet.
- Bake for 12-15 minutes or until golden brown.
Notes
Nutrition
By following these tips, you should be able to achieve delicious, flaky, and tender buttermilk biscuits. Enjoy your baking!
Regenerate response


Thanks for the recipe for the biscuits. I will try them out.
You’re welcome!
I really enjoy your email recipes and growing up in the 50’s and 60’s, my mother was a Louisiana native and fantastic cook, my father a native Virginian and meals (especially Thanksgiving) at my grandparents’ home in Southeastern Virgina were amazing. I made a batch of these biscuits and they came out fine but a little hard. I thought my oven temp control might be a little out of calibration, but I baked them for 20 minutes. I relooked at the recipe and noted that the “cook time” in the header shows 15 minutes and item # 7 in the instructions shows “Bake for 20 – 25 minutes, or until golden brown. Also, in the article the time of 12 to 15 minutes or until golden brown was used. I’m going to make another batch tomorrow and set my timer to 12 minutes and then watch through to 15.
Anyway, thanks for all your recipes. Keep’em coming. My son and his family really love the food and he’s a fan now too.
Hi John,
Thank you so much for all the kind words! I love that it brings back memories for you. Sorry about the mixup. It should be approximately 15 minutes or until golden brown. I will fix that. Thank you!
Best biscuit recipe I’ve tried. Rich, buttery flavor and very flaky with a crunchy outside. Definitely a keeper recipe.
I love to hear that! Thank you so much!
Can you freeze the uncooked biscuits and cooked later?
You can! You can actually bake from frozen, but they will need a few more minutes to cook.
thanks for this recipe, I, as a Brit, have never had american biscuits but am now going to have a go 🙂
I hope you love them. Be sure to come back and let us know what you think!
Is the flour self-rising or all purpose?
Great question! It’s all-purpose. The salt and baking powder will help it rise.
I’ve always added baking soda when using buttermilk. Should I just leave it out this time?
Hi Valerie,
Great question. The baking powder is doing all the work here, so you don’t need any baking soda in it. Baking powder has baking soda in it, so it will rise. Let me know how you like them!