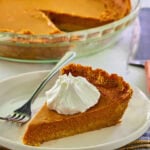
Pumpkin Pie With Graham Cracker Crust
Need a crunchy and sweet crust for your creamy pumpkin pie filling? This is the recipe. It's easy, tastes amazing, and features all the flavors of fall.
Servings: 8 pieces
Calories: 355kcal
Ingredients
Crust
- 1 ½ cups finely ground graham cracker crumbs You need at least two sleeves for this.
- ⅓ cup white sugar
- 6-7 tablespoons unsalted butter melted
- ½ teaspoon ground cinnamon
Pie Filling
- 3/4 cup sugar
- 1/2 teaspoon salt
- 1 teaspoon ground cinnamon
- 1/2 teaspoon ground ginger
- 1/4 teaspoon ground cloves
- 1/4 teaspoon ground nutmeg
- 2 eggs
- 15 ounce can of pumpkin pure pumpkin - I used Libby's
- 12 ounce can evaporated milk
Instructions
- Graham Cracker CrustPreheat the oven to 375 degrees.
- 1. Crush up the graham crackers and add them to a bowl with the melted butter, sugar, and cinnamon.
- 2. Mix and press into a 9-inch pie shell and bake for 7 to 10 minutes.
- Pumpkin Pie FillingPreheat oven to 425 degrees for part of the cooking time (see bold print below)
- Add the sugar, salt, cinnamon, ginger, cloves, nutmeg, eggs, pumpkin, and evaporated milk to a large mixing bowl and mix everything together until it is combined.
- Pour mixture into the graham cracker pie crust and fill the pie shell.
- Bake at 425 degrees for 15 minutes. Lower the oven temperature to 350 degrees, and bake for 50 more minutes or until a cake tester or knife comes out clean.
- Let cool for two hours.
- Be sure to place the pie pan on a cookie sheet in case the filling drips over while baking.
Notes
Tips for the pumpkin pie:
- Prevent a Soggy Crust: When you bake the crust before adding the pumpkin filling, you will not end up with a soggy crust.
- Spice It Up: You can always experiment with different spices in your pie. Try some allspice or cardamom to give it a different flavor.
- Don't Over Mix: When making the filling, mix until the ingredients are combined. When you over mix, you will be adding air into the pie, and that might cause cracks while baking.
- Check On The Pie While Baking: On occasion, check on the pie to make sure the edges of the crust aren't getting too brown. If they are getting brown, use a pie shield or some aluminum foil to cover the edges while it finishes baking. This will keep it from getting too brown on the edges.
- Chill Before Cutting: Let the pie sit in the refrigerator for a few hours or overnight before cutting. This will make it easier to cut. However, be sure to let it cool before refrigerating, or you will get a build up of condensation in the container.
- Store The Pie Properly: If you have any leftovers you can store them in an airtight container and keep it in the refrigerator. It can be enjoyed for up to 3-4 days.
- Use a Food Processor for the Crust: To get an extra fine crust, use a food processor. If you don't have one you can add the graham crackers to a large bag and use a tool or the palm of your hand to crush the crackers.
- Bake the Pie On a Cookie Sheet: Line a cookie sheet with aluminum foil or parchment paper and place the pie on it while it bakes. If the pie bubbles over, you won't have a huge mess in the kitchen.
- Don't Worry About Imperfections: If something doesn't look quite right, remember that rustic and homemade is always the best. What's most important is the flavor and the love you put into it.
Nutrition
Serving: 1 | Calories: 355kcal | Carbohydrates: 47g | Protein: 6g | Fat: 17g | Saturated Fat: 9g | Polyunsaturated Fat: 6g | Cholesterol: 87mg | Sodium: 275mg | Fiber: 1g | Sugar: 37g